 |
|

|
 |
 |
Introduction
Okay, so you just came home from the only place in town that sells this incredible joystick. You've taken out a second mortgage to help pay for it; you've spent weeks and weeks convincing your better half that it is a justified purchase; you've cleared off your desk and put up a sign saying 'reserved: heavy gear!" And now, you have it. It's taken a while, but you have it. You gently put it down on your desk (at least, as gently as a 20 pound metal joystick and throttle could be put down). Now you ask yourself ... what the heck do I do now???? Well, you have come to right place. This section explains step by step how to setup your new HOTAS Cougar to fit your needs. I know you are anxious to get started, so let's get on with it already.
Text in green is for general or background information, or somewhere I wanted to waffle on about something that was of interest to me at the time, and probably completely dull to you. C'est la vie!
If the images don't appear in this install guide, please hit your browser's Refresh button
Translations of this document
What you need before you start installing your Cougar
First of all we need some software to install. My first bit of advice here is this:
Do NOT use the software from the CD that came with your Cougar
It is very likely to be the original software that was released when the first Cougar was released, and you will run into problems if you use it. (Now to be fair to TM, new Cougars in the future will be shipping with the latest software and firmware, because a few months ago we remastered the original CD and put onto it the latest software. But the new stick I bought in September 2005 was still with the old software and firmware, so yours is likely to be the same. I am still therefore recommending that you use the latest software downloadable from the net and do not put whatever CD comes with the Cougar in your machine. All the software and manuals are available online.
So we are going to use the latest versions of the Thrustmaster (TM) software and Foxy that are available to download from Cougar World's Updated firmware, software, documentation, translations page. Currently you need the following files:
3_HCO_2004.exe (6.31MB) - the main Thrustmaster Cougar software, developed by TM.
Foxyv4.zip (14.2MB) and Foxyv4FSSP.exe (12.3MB) - Foxy, the main editing interface, developed by James "Nutty" Hallows for TM.
You will also need:
1 HOTAS Cougar
1 USB port. (The USB connector on the rear of your computer (ie. integral to the motherboard) or a powered USB hub are your preferred ports. You may run into problems with unpowered hubs or USB ports built into other hardware, such as keyboards.)
So go and download the software now, but do not install it yet, and do not connect up your joystick yet either.
Installing the software
I'm going to assume you've not installed any of the TM software before. If you have, you should uninstall it from Control Panel's Add/Remove programs, and not by just running 3_HCO_2004.exe.
STEP 0: Do not plug in your HOTAS Cougar.
If it is already plugged in, cancel any on screen menus that have appeared and unplug it.
STEP 1: Install the TM software.
To do this run 3_HCO_2004.exe by double clicking on it.
If you can't see the "exe" ending after the file name (known as the file extension), it's because Windows defaults to not showing you many file extensions. It thinks you're a moron. Remind it that it's there to do your bidding and nothing else, and it has no right to think of you with any feeling of superiority. Double click on the "My Computer" icon on your desktop, goto the Tools menu, select Folder Options, and then the View tab, and deselect the "Hide extentions for known file types" checkbox, and press the OK button.
During the install process it will at some stage ask you to connect your Cougar. You don't need to do it at this stage but I recommend that you do. However, I want you to do the following:
Only connect the joystick (so without the throttle or any rudders you have connected) and when you do so, KEEP THE TRIGGER HELD IN whilst you connect it and continue to do so for a few seconds afterwards.
This is vitally important. What this does is to clear the firmware from the joystick, because an older firmware with the latest software can cause installation problems. Don't worry, we're going to send the new firmware to the joystick soon.
Windows will now recognise the Cougar and should automatically start to install several devices. The only two devices that Windows will not know where to find on its own is the 'Thrustmaster HOTAS Cougar (IN)' and the 'Thrustmaster HOTAS Cougar (OUT)' drivers. Windows will display a dialog box asking you where these drivers are located. If it asks you whether you want Windows to go online to search for the latest drivers, say "No." This is a Windows XP SP2 change. If you get a Window warning you that the drivers being installed are uncertified or aren't digitally signed and do you want to continue, say "Yes" you do want to continue, and grumble quietly to yourself about the nerve of some software questioning whether you know what you're doing! Windows should find the driver and install it with no problems. Do the same for the other driver also.
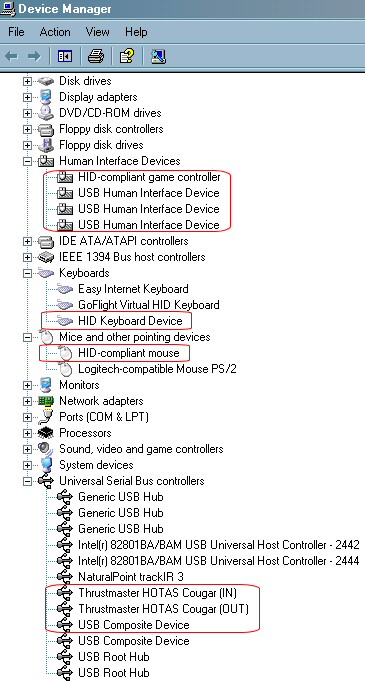
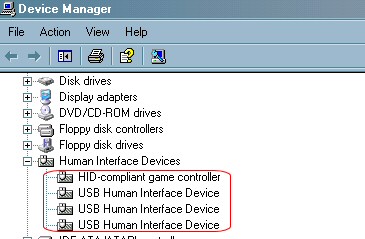
For those who are interested, the devices that Windows will install when it installs all the devices are the following:
- HID-compliant keyboard
- HID-compliant mouse
- HID-compliant game controller
- Thrustmaster HOTAS Cougar (IN)
- Thrustmaster HOTAS Cougar (OUT)
- USB Composite device
- Plus three more HID-compliant devices
The HID (Human Interface Device) are simply devices that simulate the actions of the keyboard, mouse and joystick. These are needed to allow the HOTAS Cougar to do the emulation and behave as if it was one of these devices. Here's a screencapture of Device Manager.
 Click to enlarge
So we have the HOTAS Cougar installed. But we're not ready to use it yet, because firstly it needs some firmware, and then secondly, we need to attach the throttle. Let's get some firmware downloaded to the stick.
STEP 3: Download the firmware to the joystick
Click to enlarge
So we have the HOTAS Cougar installed. But we're not ready to use it yet, because firstly it needs some firmware, and then secondly, we need to attach the throttle. Let's get some firmware downloaded to the stick.
STEP 3: Download the firmware to the joystick
Leaving the stick (and only the stick) connected:
1.) Click on the Start Button / Programs and the Thrustmaster HOTAS Cougar menu group.
2.) Click on HOTAS Cougar Update
3.) Follow the instructions as the firmware is updated.
When the process is completed and it asks you to move your axes around, just for the moment, press the OK button. Now we're going to connect up the throttle.
For your information, there's a whole section of the manual and a page here on Cougar World devoted to understanding everything you wanted to know about updating the firmware.
STEP 4: Disconnect the joystick, connect up the throttle, and then reconnect the joystick
Let's get the throttle connected. I'm not going to bother with rudders just yet.
1.) Disconnect the joystick from the computer.
2.) Attach the cable from the throttle to the back of the joystick.
 3.) Reconnect the joystick plugging it into your computer. Do not move the axes around until Windows has finished recognising it.
4.) Now this is important. Important enough for it to get its own section .....
STEP 5: Move all the axes to their mimimum and maximum positions, starting with the ANT rotary on the throttle
I want you to move the throttle's ANT ELEV rotary (the ANT knob) to its fully counterclockwise position and hold it there for a few seconds, and then to its fully clockwise position. If your ANT rotary feels as though you could pull it out a little, then do this whilst rotating it. You may have a problem with your ANT rotary .... I'll come onto this later. Now let's move all the axes throughout the entire course of their travel, the 2 joystick axes, the throttle axis, the Range rotary and the two microstick axes. Do not, and I repeat, do not miss out this important stage. It only needs to be done after flashing the firmware.
I often get asked this question - which direction is counterclockwise? For rotaries ... it's when looking at the rotary face on. In otherwords rotate the ANT towards the "A" in ANT ELEV.
Some background information for you: So why do we need to start with rotating that ANT rotary? Well, the throttle PCB comes in two versions. When you clear and reflash the firmware, it needs to know which PCB you have. It does this by measuring something when the ANT rotary is fully anticlockwise. It then stores that information into itself .... which is why you only need to do that once per firmware update. Moving the rest of the axes is used by the autocalibration routine, and there is more on this in the CCP's manual .... something for later.
STEP 6: Run the Cougar Control Panel
1.) Click on the Start Button / Programs and the Thrustmaster HOTAS Cougar menu group.
2.) Click on HOTAS Cougar Control Panel. (Also known as the CCP).
3.) The very first time you run the CCP, it should tell you that there is no default profile loaded. Simply click on OK to allow the CCP to load the default profile. This configures the joystick with the default settings that should work well for typical use.
4.) Close down the CCP.
Your Cougar is now installed, and ready to go. But let's get Foxy installed now as you'll be using this as your main interface between you and the Cougar.
STEP 7: Install Foxy and its Flight Sim Support pack
The installation of Foxy comes in 2 downloads:
Foxyv4.zip contains the files required to install Foxy and its supporting applications.
Foxyv4FSSP.exe (Flight Sim Support Pack) contains joystick and macro files for
most of the flight sims currently available. You do not need to install this
if you don't want to, although if you are a beginner to Foxy or TM programming,
it is highly recommended. If you don't install this, the Favourites menu in
Foxy and in FoxyGUI will be empty.
Let's get it installed then.
1.) I recommend rebooting your machine before installing. Just a good habit
to get into.
2.) Ensure you have NO running applications. This includes programs like
virus checkers, internet software, First Aid, Ad-Aware etc.
3.) Extract the contents of Foxyv4.zip to your computer (say to your desktop)
and run the setup.exe file. Foxy will ask you where you want to install it to,
and I recommend that you let it install to its default location: C:\Program Files\Foxy
4.) If you have downloaded the Flight Sim Support Pack (Foxyv4FSSP.exe),
you should run it and unzip its contents into Foxy’s folder now before running
Foxy. By default this will be located at: C:\Program Files\Foxy\. If you run Foxy
before installing the Support Pack, and want to set up the support for various
flight sims on Foxy’s Favourites menu, then close down Foxy, delete Foxy.ini
and run Foxy again.
5.) Now REBOOT YOUR MACHINE. Foxy won't ask you to do this, so please do
it yourself.
6.) Once you've installed Foxy, and rebooted, then you can run it from
the Thrustmaster HOTAS Cougar program group.
That's it .. Foxy is installed, the TM software is installed, and your Cougar is installed.
STEP 8: Connecting rudders
We could have connected up any rudders you might own in Step 4. But I've left this to here so I can waffle on a little bit about rudders and the Cougar.
1.) If you have USB rudders, then they are a separate entity from the Cougar, and will be seen by Windows as separate to the Cougar. They cannot be programmed using the Cougar software. Be aware that if you are using a sim or game that only recognises one controller at a time, then you will not be able to use the Cougar and your USB rudders at the same time. This is why the Cougar has a gameport connector at its rear to accept rudders that will connect through it, and hence be seen as one controller.
2.) The rudder connection is not hot pluggable. That means that if you now attach your rudders, the Cougar won't report this fact to Windows. You need to connect your rudders, then either hit the Restart button in the CCP, or what I do its just disconnect my Cougar and then reconnect it. If you can't reach your joystick's connection to the computer easily, cheat and disconnect and reconnect your throttle connector, which is hot pluggable.
3.) If you have Thrustmaster RCS or Elite rudders, just go ahead and connect them.
4.) If you have gameport CH rudders with toebrakes, your toebrakes won't be recognised. There is a thead in the forums discussing how to get around this with some rewiring of your rudders.
5.) If you have Simped single axis rudders (not the F-16 rudders with toebrakes), then please read this important document: Simped Rudder Users
I hope everything works well the first time and you have hours and hours of fun with your new purchase. Enjoy! So what next? Well, I guess I'd go and have a read about Flying with Favourites and I'd certainly be delving into the manuals, the latest versions of which are accessible from Foxy's Help/Manuals menu. I'll write another section on how to test your Cougar, but for the moment there's a post here that you might like to read.
James "Nutty" Hallows - last updated October 22nd, 2005
|
|
|
|
|
|
|
|
1.1) Help! I installed my Cougar and forgot to attach the throttle to the joystick during installation. The installation went fine but when I attached my throttle, its buttons aren't detected. How do I fix this?
When you're setting up the Cougar for the first time, and you do so with only the Cougar joystick plugged in, it will be detected as it should be - with 18 buttons, a POV hat and 2 axes. If you then connect the throttle, the Control Panel's Gaming Options applet will show the correct number of axes, but not the correct number of buttons which should be 28, not 18. This is because of some keys in the registry containing incorrect information, and it is not refreshed properly. The easiest thing to do is to first plug the controller with the maximum hardware attached when you first install. If there are any problems, the simple solution is to start the Cougar Control Panel (CCP), and click on the "Restart device". The CCP will then delete the problem keys, and the hardware will load properly. For those who are interested, the only way around this would have been to have separate PID's for each hardware configuration, however this would have been 6 factorial, or 720!
|
|
|