1.1) How do I connect the Cougar to my computer?
There's a single lead coming from the joystick's base, that teminates in a USB conector. Either plug that directly into a USB port on your computer, or into a port of a USB hub connected to your computer. I have mine connected into a Belkin 7 port USB hub and it's perfect.
1.2) What about the Cougar's throttle and my old rudders?
Everything plugs into the base of the joystick. So the Cougar throttle plugs in there, and if you have rudders terminating in a gameport connector, these too plug in there.

1.3) Why does everything plug into the joystick? And what are the advantages to this?
Everything plugs into the base of the joystick, because all the processing of the buttons and axes occurs on the joystick's circuitry, and then the joystick decides what to send down the single USB cable. The advantage of this is that the Cougar gets seen as one gaming controller, with a load of buttons and axes. Most flight sims and games are only capable of reading in the information from one gaming controller. If the joystick and throttle had to plug into separate USB ports, then most sims wouldn't see them both unless you ran them through some constantly running software drivers combining and filtering the signals from both units. The Cougar is designed to do everything within its own hardware, thus imposing no additonal burden on your processor, hence maximising your game frame rates.
1.4) My motherboard is USB 2.0 compliant. What does the Cougar support?
The Cougar is USB 1.1 compliant, although it doesn't actually use any of the 1.1 spec features, so it should work on 1.0. Note that USB is backwards compliant, so the Cougar will be just fine on USB 2.0 Motherboards.
1.5) Can I use a USB extension lead with the Cougar?
In this thread, WarDogz posted: "I saw a question asked: If a USB extension would interfere with the Cougar's operation. I picked up a 6 foot (2 metres) extension yesterday and it works fine. I've been told that USB devices should not exceed 10 feet (3 metres) in case anyone wanted to know."
2.1) I don't have rudder pedals. Is there a way for me to control the rudders from the Cougar?
Yes, there's all sorts of ways. The Cougar defaults to controlling your rudders using it's Range knob on the throttle if you don't have rudders connected. However, you can use any axis to control rudders, or even a hat or pair of buttons. It's not a problem.
2.2) What rudders are supported with the Cougar?
The Cougar supports the single axis of all rudders that terminate in a gameport. These include the TM RCS, TM Elite, CH rudders and Simped rudders - (the latter being my favourite - James). Note that the toebrakes on the CH rudders are not supported.
2.3) Where can I order the Simped rudders from?
A new site is up here, with information on the new Simped rudders with toebrakes - the Simped Vario F-16 plus. Take your pick from the Simped Vario F-16 plus, SIMPED-vario/pro or the cheaper SIMPED-vario rudders. Do not get the USB versions - you want the gameport versions!
2.4) Simped pedals with a serial number lower than 2000 10*** are not compatible with the Cougar. More information ...
This information is from this thread in the forum. "Dieter stated that due to technical specifications older Simpeds with a serial number lower than 2000 10*** are not compatible with the Cougar. All current Simpeds are working 100 % with the Cougar. You can recognize all compatible Simpeds easily: They must have at least one LED in the base plate.Upgrades are not possible." Thanks to Terrapin for this info.
2.5) Why is it a disadvantage using USB rudders with the Cougar?
There are a couple of disadvantages actually. First of all, if you have a flight sim that supports only one gaming controller, then the rudders won't be seen at all. Secondly, if you choose to purchase USB rudders rather than those that plug into the Cougar, then you miss out on all the programmability the Cougar can impart to those rudders. For me, the latter is something I'm not prepared to give up.
2.6) When will Thrustmaster be releasing their new rudder pedals with toe brakes?
At the moment, I believe development of these is on hold - and will be for some time. However I recommend anyway that you look at the Simped Vario Pro rudders.
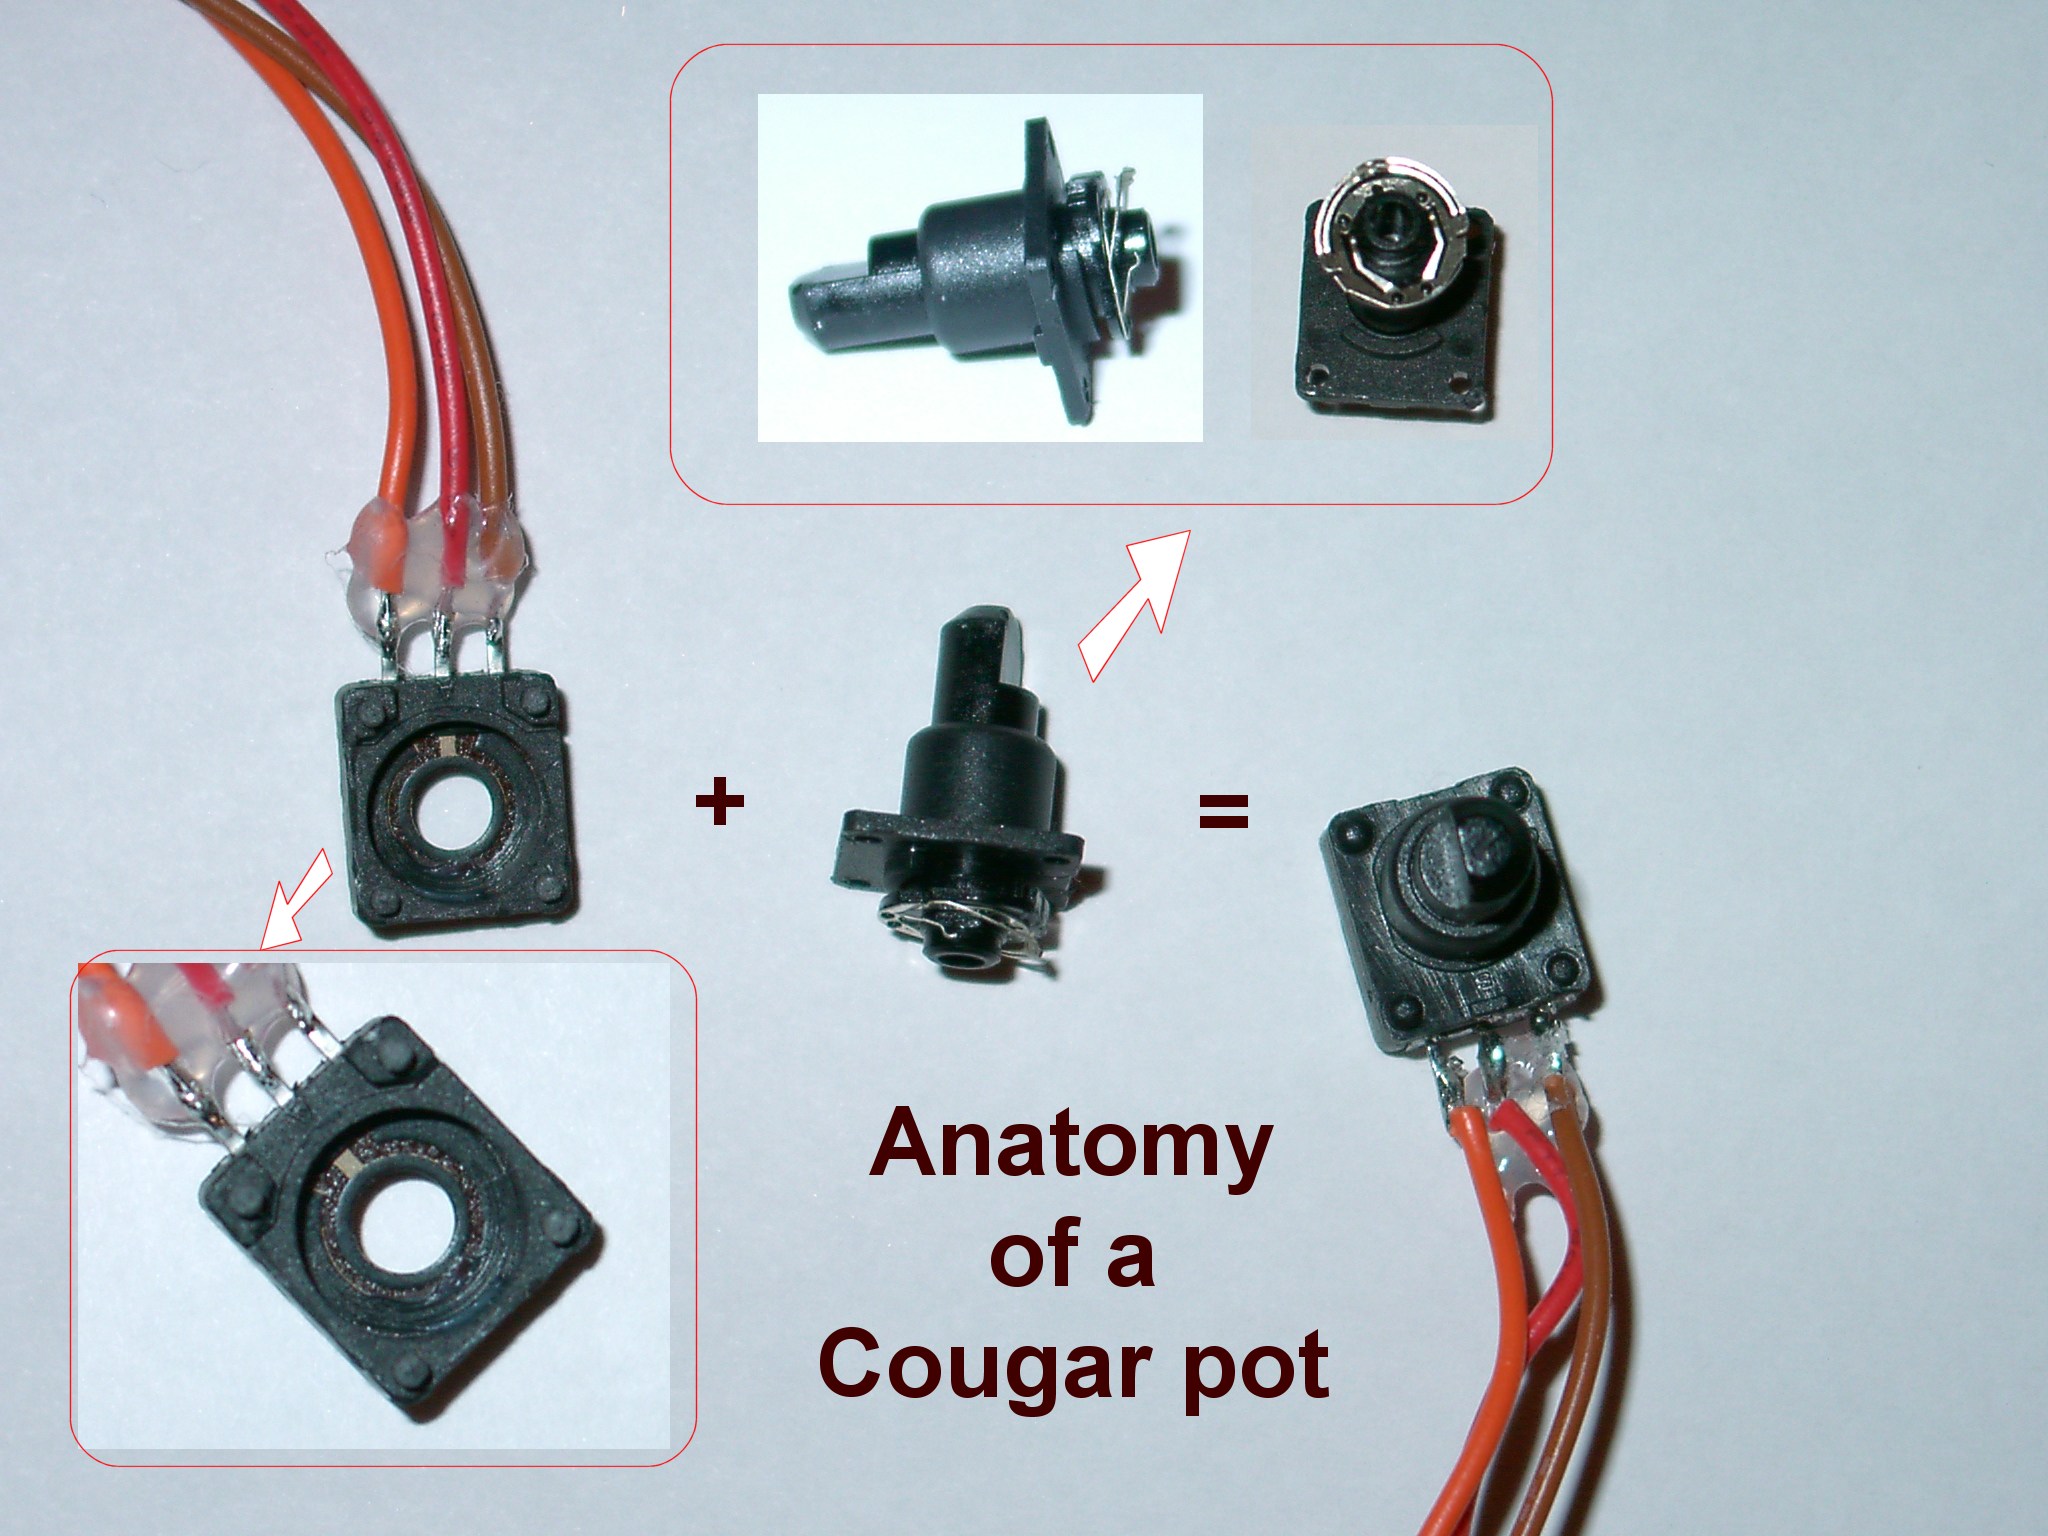
3.1) What do the pots look like and how can I clean them?
It is unfortunate that CTS continue to provide pots to Thrustmaster that may cause "spiking" - which you will see as a rapid change in axis value either in one of Foxy's analysers, or in flight within your sim. Thankfully it's nowhere near as bad as it was in the F22, but there's no doubt you may suffer from it in time with your Cougar. I haven't seen this problem with a new Cougar yet, but I have seen it with a used one. Thankfully, this is easily fixed by removing the pots, taking them apart and cleaning them. Or you may want to look into CubPilot's hall sensor modification.
To locate the pots in the joystick, check out Terrapin's HOTAS Cougar pages where you'll find excellent high resolution pictures of the Cougar innards. There are 3 main pots that you can remove and clean if you need two. Two are within the joystick for the X (left and right) and Y (forwards and backwards) axes, and the third is in the throttle for the main thrust axis. We'll ignore the range and antenna knobs here.
The first task then is to remove them and this is very easy compared to the old TM F-22 PRO. Before you do this disconnect your controllers from your computer.
For the joystick
- 1.) Unscrew the 4 screws holding the baseplate onto the base, and remove it.
- 2.) Look at the gimbal system and identify 2 screws holding the plastic pot housing. Remove these.
- 3.) Slide the pot housing outwards and off, and you can now access the pot.
- 4.) You may want to remove the printed circuit board (PCB) if you want to work with the pot away from the Cougar. To do this unscrew the 4 screws where the throttle and rudders would connect, and then the screws holding the PCB in place. Now it can be turned over and you can pull out the pot connector from the PCB, freeing the pot from the Cougar entirely.
For the throttle
- 1.) Lift the throttle arm to ease the pot out of it's socket.
- 2.) Slide the pot out of the throttle arm, and disconnect the connector from the PCB.
 Click for larger image - (warning, 0.4MB)
To clean the pots
Click for larger image - (warning, 0.4MB)
To clean the pots
- 1.) With an exacto/sharp scalpel ease the casing off of the pot, being sure to go all around the sides of the pot (breaking the posts is not necessary, it should slide off, after a little effort).
- 2.) Clean out the pot, use a clean rag, or strong tissue.
- 3.) Replace the grease with just a dab of vaseline (don't fill the pot with the stuff, just a thin coat on the side of the casing with the wires.) This is just to protect the pot from excessive wear.
- 4.) On the shaft, you'll see two crimped wire-like pieces of metal, running parallel to each other, this is the carbon film contact point, feel free to bend it away from the plastic by an additional 10 degrees or so.
- 5.) Also on the shaft are the wiper return wires, closest to the shaft's center, once again, feel free to bend those up by an additional 10 degrees or so (be careful, do not bend laterally, as this might affect the contact.)
- 6.) Press the pot back together, and re-insert.
3.2) Will replaceable spring sets ship with the Cougar?
No. This was the original idea but it proved not to be possible. The spring strength by the way will be similar to that of the F-22 PRO. On another note, if you take F-22 PRO springs and put them into the Cougar, because of the metal weight of the Cougar and it being slightly taller, the effect is a much softer feel that some of you may prefer. Also see 3.4) below.
3.3) Does the Cougar have force feedback?
No. The size and weight of the Cougar would require a bulky and powerful force feedback mechanism. This would increase the overall dimensions of the Cougar considerably, as well as the cost.
3.4) How can I reduce the tension of the Cougar so it's easier to use? Or - how do I remove the rubber boot from the joystick?
Remove the rubber boot as this has considerable influence on the stiffness of the stick. To do this:
- 1.) Disconnect the Cougar from your computer or USB hub.
- 2.) Unscrew the handle.
- 3.) Remove the 4 screws from the metal base ring.
- 4.) Lift off the rubber boot.
- 5.) Reassemble.
Others find that the older F-22 PRO springs give a better/lighter feel.
4.1) What replacement handles are TM developing and when will they be available?
At the moment we are waiting to hear from TM what their development plans are for further hardware.
4.2) Is the throttle handle replaceable?
No.
4.3) How do I remove/replace a joystick handle and does it need to be unplugged for this?
The stick is held on to the base by the large grey knurled knob just above the rubber sleeve. This needs to be rotated anti-clockwise to remove the stick, and clockwise to re-attach it. There's just one thing you have to remember when removing/replacing the joystick handle. Do it in a manner so that you protect the PS2 connector. So hold the stick vertical and rigid with one hand so that when you unscrew it, you don't at any point twist the central PS2 connector, and then lift it away cleanly and vertically. To re-attach, it's the exact opposite. Make sure the stick is facing the correct way, align the central PS2 connector and seat that, holding the stick vertically, and then rotate the greay knurled knob clockwise. When you do this, unplug the Cougar from the USB (or power down your computer). Generally, it isn't a problem, however, I'd recommend that the Joystick not have ANY power when removing the stick handle.
5.1) I'm building a cockpit and I need to know the dimensions and weight of the Cougar. Where can I find that information?
It's over on the Features page in the Mechanical section.
6.1) Are the hats, their shafts and the buttons also made out of metal?
Yes.
6.2) Why did TM choose 4 ways hats and not 8 way hats?
4 way hats last considerably longer and there's no advantage to be gained from using 8 way hats. In fact they increase both the manufacturing and component costs. Note that compared to the F-22 PRO and F-16 FLCS, the Cougar hats have been purposely brought out more so imparting great control and increased throw on the hats and improving direct movement into the corner positions. They're very nice ;)
6.3) What makes up a hat?
 If you have to open one up, be careful to take the necessary precautions so as not to scratch the paint, and to unplug the controller from the usb first.
To remove the metal cover of the HAT, use a standard screw driver between the metal cover, and the plastic housing, turn it gently while going around the cover, slowly prying it off.
If you have to open one up, be careful to take the necessary precautions so as not to scratch the paint, and to unplug the controller from the usb first.
To remove the metal cover of the HAT, use a standard screw driver between the metal cover, and the plastic housing, turn it gently while going around the cover, slowly prying it off.
7.1) How do you adjust the throttle tension/what is that wheel on the front of the throttle by the serial number for?
As you might have guessed from the question, the small dial on the front of the throttle by the serial number adjusts the throttle tension. As it's part of a horizontally oriented wheel, rotate it clockwise to increase throttle tension. Thanks to Vlad for this next bit. "It raises and lowers a lever. The other end of the lever has a nylon (or plastic) friction pad which presses against the throttle axle. Turning the thumb-wheel right to left increases the pressure on the axle. You get tactile feedback. The harder it is to turn, the more pressure you're exerting and the more difficult it will be to move the throttle lever."
7.2) What's the clicking noise from the throttle as I move it?
These are the detents, and are there by design (so no, your throttle isn't broken!) ;) In a real jet, there are positions within the travel of a throttle that act as "stops" or "detents" that signal a particular thrust setting. In the F-16 there are two such detents, the first called the "Idle" Detent (just forward of the throttle full back position) and the other called "Mil" - or Full Military Power Detent (just short of throttle fully forwards), forward from which the Afterburner stages are obtained. There's an interesting diagram showing this better here.
7.3) How can I adjust/remove the throttle detents?
An article will come later explaining how to do this, but for the moment there's an excellent thread discussion on this here.
7.4) Where is the microstick on the throttle?
Please see this photograph.
7.5) Is it possible to realign the microstick so the axes work in the direction more to my liking?
I don't know about you, but it took me some time to get used to the microstick and the directions it calls its X and Y axes. It does take some getting used to, but like the Cougar, it settles in after time. For those who find it awkward to use though, WarDogz has noticed that it can be rotated physically. Here's his post on the matter. "I decided to have a look at the microstick having noticed it was off center some time ago. Taking the throttle apart I wondered if the microstick assembly could be moved instead of moving the metal ring on the outside of the casting which would require new scew holes. I was pleasantly surprised to find that the black plastic retainer clip that holds the microstick assembly in place comes off easily and the whole assembly slips right out after that as well. I determined that the ms assy could be adusted into center by simply sliding it up away from where it is seated on 2 small metal protrusions or tabs built into the casting to hold it up. These, as well as the formed casting around the Dogfight and Speedbrake switch bases, were not built precisely to the switch specs and are the problems with reqard to these devices being misaligned. The fix for the microstick was fairly simple. Holding the assy in place where you want it (lifted off the tabs slightly), simply apply a couple of small drops of hot glue on either side, replace the plastic retainer clip and apply a couple drops to that as well...and that's that! While I was in it I applied hot glue to the DF and SB switches as well having already cut away the casting to allow them to swing into alignment...the hot glue was to ensure they do not move even the slightest."
7.6) The "Dogfight" and "Speedbrake" switches on my new throttle are broken! What's going on?!
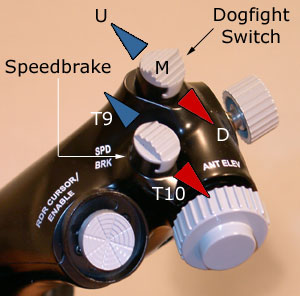 This is something I think we've all noticed, especially those of us used to the original TQS throttle. These switches are not broken - they're just very stiff and need to be worked a little to settle in. Let me explain further. For those that don't know, let me explain the physical operation of these switches, (see the image above). The dogfight switch has 3 locking positions. By locking I mean that when you take your finger off the switch after moving it, it stays in that position. These 3 positions are the Up (U), Middle (M) and Down (D) positions, as shown in the diagram. We say that the Speedbrake has two positions, T9 and T10, because we program these two positions, although physically it has 3 positions - T9, rest position, T10. From the rest position, moving the switch to T10 is a locking position. Moving from the rest position to T9 however isn't - when you pull the speedbrake back, and then let go, it springs back into its rest position. This is normal, by design and exactly how it is on the real F-16 throttle.
When the Cougar throttle is new, the T9 in particular is pretty stiff, and both the "Dogfight" and "Speedbrake" switches aren't as clicky as they were on the older TQS. This actually improves with use, so give them time, and they'll be fine.
This is something I think we've all noticed, especially those of us used to the original TQS throttle. These switches are not broken - they're just very stiff and need to be worked a little to settle in. Let me explain further. For those that don't know, let me explain the physical operation of these switches, (see the image above). The dogfight switch has 3 locking positions. By locking I mean that when you take your finger off the switch after moving it, it stays in that position. These 3 positions are the Up (U), Middle (M) and Down (D) positions, as shown in the diagram. We say that the Speedbrake has two positions, T9 and T10, because we program these two positions, although physically it has 3 positions - T9, rest position, T10. From the rest position, moving the switch to T10 is a locking position. Moving from the rest position to T9 however isn't - when you pull the speedbrake back, and then let go, it springs back into its rest position. This is normal, by design and exactly how it is on the real F-16 throttle.
When the Cougar throttle is new, the T9 in particular is pretty stiff, and both the "Dogfight" and "Speedbrake" switches aren't as clicky as they were on the older TQS. This actually improves with use, so give them time, and they'll be fine.
7.7) Is the ANT knob on the Cougar throttle the same as the ANT knob on the older TQS throttle?
Yes, so if you want to replace one, then all you need to know is how to wire it in:
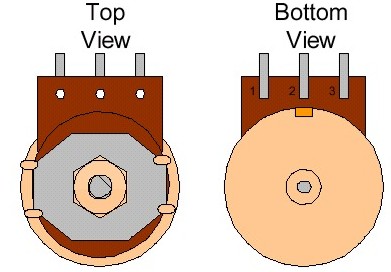 The wiring, if you take the pin numbers according to the above picture, is green (pin 15 of JF1) to pin 1 of the pot, yellow (pin 14 of JF1) to pin 2, and blue (pin 16 of JF1) to pin 3.
8.1) Microsoft product Support: Universal Serial Bus (USB) devices that are connected to a Windows 98 Second Edition-based computer may not work if the following hardware components are installed on the computer: An AMD processor (running at 350 MHz or faster),A VIA Technologies USB controller.
Please see this Microsoft Support article: USB Devices May Not Work in Windows 98 Second Edition (Q240075).
9.1) Gigabyte GA VTX-E requires latest BIOS firmware update to ensure Cougar compatibility
Please see this thread for further information.
|


